

Understanding Cluster Autoscaler for scalability is crucial for maximizing the benefits of your Kubernetes (K8s) platform. Cluster Autoscaler (CA), alongside Vertical Pod Autoscaler (VPA) and Horizontal Pod Autoscaler (HPA), constitutes the trio of autoscaling functionalities within K8s. HPA and VPA focus on pod-level adjustments, while CA operates at the cluster level, ensuring overall efficiency and scalability in Kubernetes.
What is Cluster Autoscaler (CA)
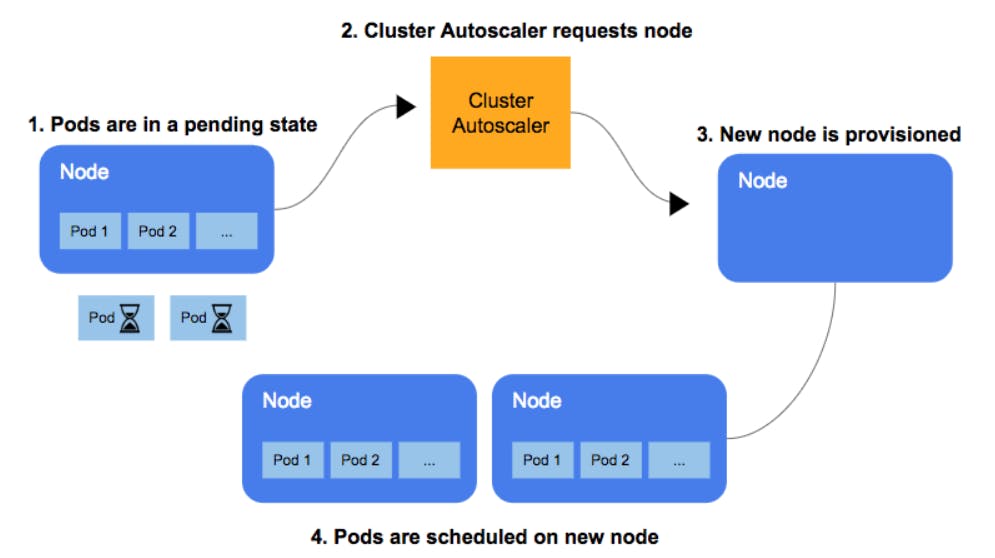
The Cluster Autoscaler automatically adds or removes nodes in a Kubernetes cluster based on resource requests from pods. For scaling, it doesn't look at how much CPU or memory the pods are using. Instead, it checks every 10 seconds (default scan interval) to detect any pods in a pending state, because the scheduler could not assign them to a node due to insufficient cluster capacity.
How Cluster Autoscaler (CA) works
In the scaling-up scenario, CA automatically adds additional nodes to the cluster when the number of pending (un-schedulable) pods increases due to resource shortages.
How to implement Cluster Autoscaler (CA)
Suppose you have an EKS cluster already in place along with managed or un-managed nodes in it. The pods are running on these nodes itself. To implement the CA on EKS cluster, follow the following steps:
Inside RBAC.yml, create a service account in 'kube-system' namespace. Create a cluster role for CA to govern the access to resources within a cluster. Bind this cluster role to the service account by creating a cluster role binding.
 apiVersion: v1
 kind: ServiceAccount
 metadata:
   name: cluster-autoscaler
   namespace: kube-system

 ---
 apiVersion: rbac.authorization.k8s.io/v1
 kind: ClusterRole
 metadata:
   name: cluster-autoscaler
 rules:
   - apiGroups: [""]
     resources: ["*"]
     verbs: ["create", "patch", "list", "watch", "update"]
   - apiGroups: ["apps"]
     resources: ["*"]
     verbs: ["list", "watch"]
   - apiGroups: [""]
     resources: ["configmaps"]
     resourceNames: ["cluster-autoscaler-status"]
     verbs: ["get", "update"]
   - apiGroups: [""]
     resources: ["pods/eviction"]
     verbs: ["create"]
   - apiGroups: [""]
     resources: ["pods/status"]
     verbs: ["update"]
   - apiGroups: [""]
     resources: ["endpoints"]
     resourceNames: ["cluster-autoscaler"]
     verbs: ["get", "update"]
   - apiGroups: ["coordination.k8s.io"]
     resources: ["leases"]
     verbs: ["get", "list", "watch", "create", "update", "delete", "patch"]
   - apiGroups: ["storage.k8s.io"]
     resources: ["csidrivers", "csinodes", "csistoragecapacities", "storageclasses"]
     verbs: ["get", "list", "watch"]
   - apiGroups: ["policy"]
     resources: ["*"]
     verbs: ["*"]
   - apiGroups: ["batch"]
     resources: ["*"]
     verbs: ["*"]

 ---
 apiVersion: rbac.authorization.k8s.io/v1
 kind: ClusterRoleBinding
 metadata:
   name: cluster-autoscaler
 roleRef:
   apiGroup: rbac.authorization.k8s.io
   kind: ClusterRole
   name: cluster-autoscaler
 subjects:
   - kind: ServiceAccount
     name: cluster-autoscaler
     namespace: kube-system
Configure deployment.yml to deploy cluster autoscaler onto EKS cluster.
 apiVersion: apps/v1
 kind: Deployment
 metadata:
   name: cluster-autoscaler
   namespace: kube-system
   labels:
     app: cluster-autoscaler
 spec:
   replicas: 1
   selector:
     matchLabels:
       app: cluster-autoscaler
   template:
     metadata:
       labels:
         app: cluster-autoscaler
     spec:
       serviceAccountName: cluster-autoscaler
       containers:
         - image: k8s.gcr.io/autoscaling/cluster-autoscaler:v1.25.0
           name: cluster-autoscaler
           resources:
             limits:
               cpu: 800m
               memory: 2Gi
             requests:
               cpu: 800m
               memory: 2Gi
           command:
             - ./cluster-autoscaler
             - --v=4
             - --stderrthreshold=info
             - --cloud-provider=aws
             - --skip-nodes-with-local-storage=false
             - --expander=least-waste
             - --node-group-auto-discovery=asg:tag=k8s.io/cluster-autoscaler/enabled,k8s.io/cluster-autoscaler/<name of your EKS cluster>
Here, the crucial parameters are:
--node-group-auto-discovery = This is used by CA to discover the Auto Scaling group based on its tag. Here is an example to illustrate the tag format:
asg:tag=tagKey,anotherTagKeyV1.25.0 = This is the release version of the EKS cluster used in our example. You must update if you are running an older version.
Apply the changes using the kubectl command line:
 $ kubectl apply -f RBAC.yml
 serviceaccount/cluster-autoscaler created
 clusterrole.rbac.authorization.k8s.io/cluster-autoscaler created
 clusterrolebinding.rbac.authorization.k8s.io/cluster-autoscaler created

 $ kubectl apply -f deployment.yml
 deployment.apps/cluster-autoscaler created
Verify the logs by issuing this command:
$ kubectl logs -l app=cluster-autoscaler -n kube-system -fCA will now check for unscheduled pods and try to schedule them. You can see those actions from the logs.
Check the status of the pods by issuing the following command:
$ kubectl get pods -n kube-system